Interstellar OST: 15.7 kHz high pitched noise

Interstellar is an awesome movie, and the sound track is even better.

But after having listened it quite few times the original sound track, I quickly realize there is something wrong, not the loudness war, something worst: noise pickup during recording, not filtered out during mixing.

Track 06: Message from Home showing the 15735Hz peak at 51dB

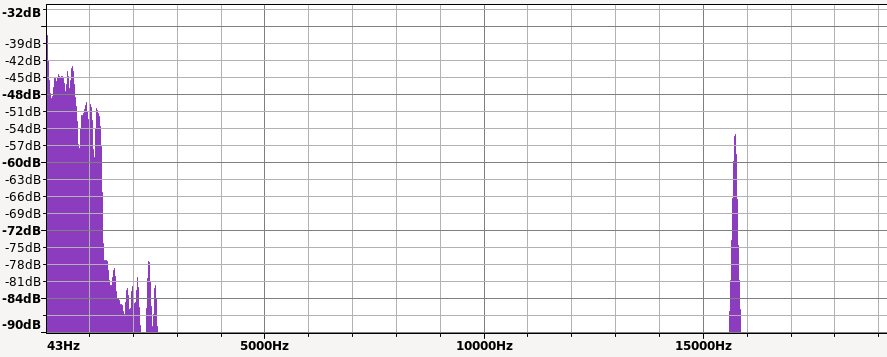
Almost the complete album is tainted, for example, in this track, “Message from Home”, is a single piano recording showing this noise standing out clearely.

Dont get me started it’s because of the MP3 or format artifact, this is present on any version, MP3, FLAC, and even on Spotify online!

Here is an extract of this sound track, do you hear it? It hurts!

06 – Message from Home extract normal speed

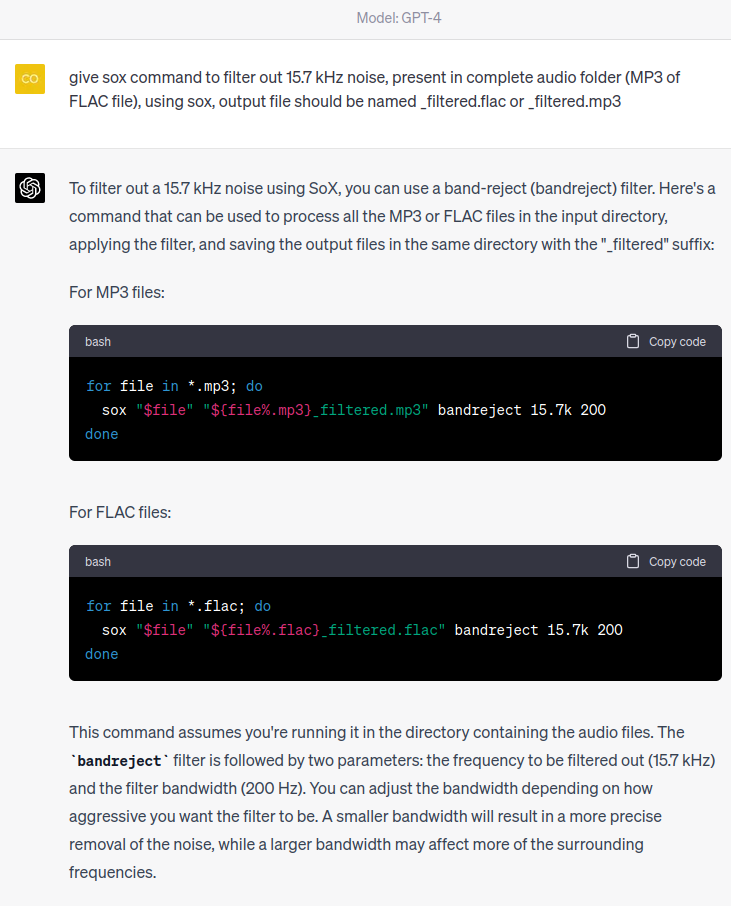
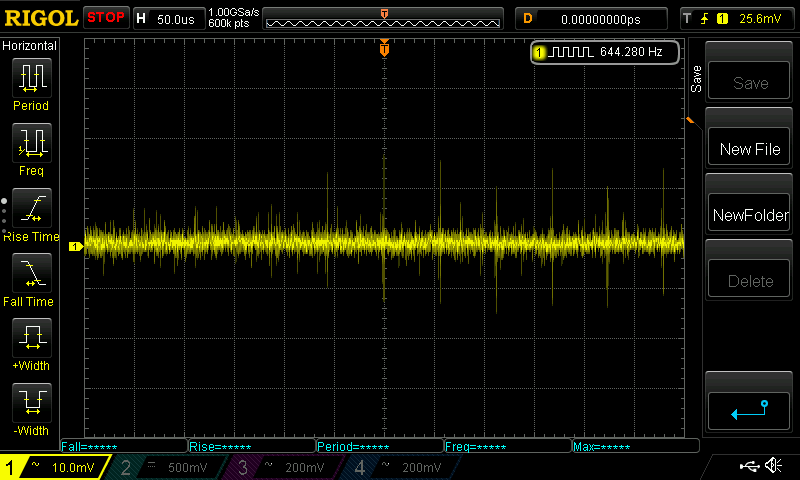
If you cannot hear sounds around 16Khz, no problem, here pitched down version, to 0.5 with the noise is now at 8Khz if you don’t hear it, you may want to consult a specialist.

06 – Message from Home extract half speed

Because it may sound crazy that a multi million dollar movie, OST and sound track composer (Hans Zimmer) get away with this, I’ve looked up and found this reddit thread mentioning it:

Well, I’m not crazy after all and it look like it’s a Pilot Signal at “15.7342657 kHz is used to indicate the presence of MTS stereo.”

So that’s it, there is nothing to do, we are stuck with this (at least I can filter out my own version), but please, mixing engineers, next time, pay attention.

Industrial manufacturing: DFM or planned obsolescence

I’ve stumble upon a fairly common appliance, present in most home, built by million of unit, a TV.

This model is a GRUNDIG 40VLE5324BG with LED backlight: not starting anymore (one could see the “Grunding” logo or “signal not present” when flashing a strong light on it).

After seeking the net for a solution, removing dozen of screws, accessing the 100cm long LCD panel made of ultra thin glass with COG and flex PCB on side, I finally had access to the culprit: No, it was not the capacitor, not the LED driver, not even a LED but a single connector: PCB to PCB connector, designed to decrease assembly time and cost. As these LED string are serial driven (140V @ 400mA), a single failure will render the whole system useless.

Just wiggling the connector would start/stop the backlight:

In this case, slight flex, oxidation or poor connector plating cause the problem, and as the LED as serial connected, the connector is oxidized from long arcing:

And the connector:

Let’s strap these connector with a piece of wire and fix this stuff!

Cheap 5ct clip will render a 500€/USD TV after few years! Hurray to planned obsolescence and global grow and economy!

USB-C iron solder: TS100

TS100 is a very good iron solder, with a rated power of 17 to 65W, when powered from 12 to 24V.

While 12V DC jack DC5525 are everywhere, 24V are less but needed if you want more heat to solder larger components or grounds. (better than the TS-80 with the weak 18W anyway)

Supplying from USB-C source with PD 19V 60W takes full advantage of this iron solder.

This hack has been made but not robust enough nor slick to my taste.

This 3 bucks USB-C to DC5.5mm @19V does the job.

Here a RAVPower 60W PD is used

Perfect for my mobile bench with the classic DPS3005 power supply.

Mini portable power supply DIY

Here is a small DIY project, for a portable/bench-top power supply. We are not aiming for the best regulation, neither most power. But portability and bench-top estate optimisation.

This is based on the famous DPS3005 (about 25€)

Let’s 3D print an enclosure, found on Thingiverse:

And grab all the jelly beans needed:

Wire/crimp/solder:

Does work quite well:

With not much noise (static 100mA load):

And as I’ve this fancy portable solder iron with a bunch of li-ion cell:

It works on the road!

Plastic part surface finish: please stop making mirror products

They are simply dust, fingerprint and scratch magnet, everything is summarised in the amazing book The Hardware Hacker: Adventures in Making and Breaking Hardware from Andrew ‘bunnie’ Huang

“My world is full of small frustrations like this. For example, most customers perceive plastics with a mirror finish to be of a higher quality than those with a satin finish. There is no functional difference between the two plastics’ structural performance, but making something with a mirror finish takes a lot more effort. The injection-molding tools must be pains-takingly and meticulously polished, and at every step in the factory, workers must wear white gloves. Mountains of plastic are scrapped for hairline defects, and extra films of plastic are placed over mirror surfaces to protect them during shipping. For all that effort, for all that waste, what’s the first thing users do? They put their dirty fingerprints all over the mirror finish. Within a minute of a product coming out of the box, all that effort is undone. Or worse yet, the user leaves the protective film on, resulting in a net worse cosmetic effect than a satin finish. Contrast this to satin-finished plastic. Satin finishes don’t require protective films, are easier for workers and users to handle, last longer, and have much better yields. In the user’s hands, they hide small scratches, fingerprints, and bits of dust. Arguably, the satin finish offers a better long-term customer experience than the mirror finish. But that mirror finish sure does look pretty in photographs and showroom displays!”

Portable soldering fumes extractor fan DIY (battery operated and USB rechargeable)

Here is a very simple fume extractor fan, to put an halt to apnea soldering.

Made of:

  • DC/DC buck boost converter (3€ on ebay)
  • USB battery pack 5€
  • scrapped fan
  • scrapped switch
  • scrapped potentiometer
  • Hammond prototype case (1€, same as my USB motion sensor)
  • nice labels
  • double side tape

Enough talk, a picture:

And in action, can suck up to 15cm at medium speed:

This “hack” took me 30min, and costs close to nothing, while some have been down to build a DC/DC converter for this!

Thing to add in the future:

  • active carbon filter for better filtering, but usable as is for small jobs: you don’t get fumes in your face anymore.
  • USB light for soldering in the dark

My favourite use: in the freezer/fridge, when you forgot to chill beers for an unexpeted party, it takes only 10min to have freezing beer instead of 1h. (remove the carbon filter first…)

USB connected digital multimeter and graph plotting (UNI-T UT61E and sigrok)

Ever wanted to have nice plot (U/I curve, whatever) simply plotted?

I got 2 UNI-T UT61E with USB cable (50€ each)

With sigrok you can easily get data from many device with a single command:

sigrok-cli –driver=uni-t-ut61e:conn=BUS.DEVICE -O analog  –continuous

Where BUS and DEVICE is replaced with the output of lsusb

lsusb
Bus 002 Device 002: ID 8087:8001 Intel Corp.
Bus 003 Device 086: ID 1a86:e008 QinHeng Electronics HID-based serial adapater
Bus 003 Device 087: ID 1a86:e008 QinHeng Electronics HID-based serial adapater

In my case, as I’ve 2 devices, so 2 different commands are used:

sigrok-cli –driver=uni-t-ut61e:conn=3.86 -O analog  –continuous

sigrok-cli –driver=uni-t-ut61e:conn=3.87 -O analog  –continuous


But what about logging in the same file the two ouputs simultaneously?

Here comes the magical function: paste and joined pipe:

paste <(sigrok-cli –driver=uni-t-ut61e:conn=3.86 -O analog  –continuous) <(sigrok-cli –driver=uni-t-ut61e:conn=3.87 -O analog  –continuous) > measure.csv


I’ll let you deal with the uber simple csv processing with octave or libreoffice calc (mV, mA range condition, etc…), as this blog entry is mainly used as a personal notepad.


Note: if you have trouble connected with sigrok, with an error. You may need to disable the power feature, with the script pointed by blog.philippklaus.de

#!/bin/bash
# see http://www.erste.de/UT61/index.html
for dat in /sys/bus/usb/devices/*; do 
  if test -e $dat/manufacturer && grep -q "WCH.CN" $dat/manufacturer; then
    echo "Suspending ${dat}."
    echo auto > ${dat}/power/control
    echo 0 > ${dat}/power/autosuspend 
  fi      
done