Adding the “send to” via email action to your Nemo/Ubuntu

How to get a “right click, send by email” menu in Nemo file browser:

Create the file:

.local/share/nemo/actions/thunderbird.nemo_action

Just cut and paste this inside that file and you’re done 🙂

[Nemo Action]
Name=Send by Email
Comment=Send by Email the files
Exec=thunderbird -compose to=,"attachment='%U'"
Icon-Name=thunderbird
Selection=notnone
Extensions=nodirs;
Separator=,
EscapeSpaces=false


Source: http://www.badpenguin.org/nemo-action-send-to-email

Linux/Ubuntu: Speaking clock with online TTS

As a followup of my previous article:

Ubuntu: talking clock every hours

4 years after the previous article, I still need this tool, but I wanted a more “natural” TTS.

So I’m using Voxygen, a natural TTS provider (very good for French), retrieving the generated voice with wget and the following command:

wget --quiet --no-check-certificate -O /tmp/clock_`date +\%-1H`.mp3 "https://www.voxygen.fr/sites/all/modules/voxygen_voices/assets/proxy/index.php?method=redirect&text=il est exactement `date +\%-1H` heures.&voice=Loic"

Here is the script to run every hours:

if [ ! -e /tmp/clock_`date +\%-1H`.mp3 ]; then wget --quiet --no-check-certificate -O /tmp/clock_`date +\%-1H`.mp3 "https://www.voxygen.fr/sites/all/modules/voxygen_voices/assets/proxy/index.php?method=redirect&text=il est exactement `date +\%-1H` heures.&voice=Loic"; fi ; mpg321 /tmp/clock_`date +\%-1H`.mp3 --gain 200

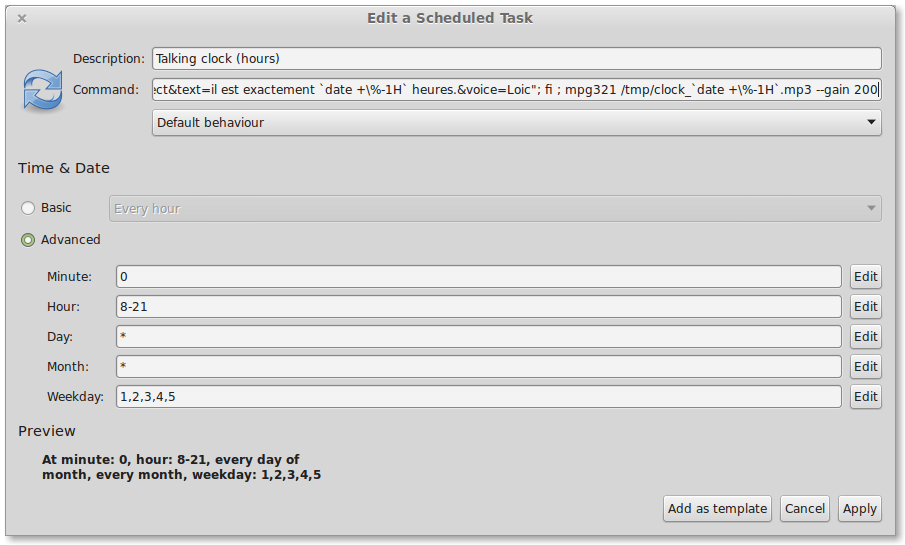
We will be using gnome schedule taks:

screenshot-from-2017-01-05-100935

Installation linux avec eyefinity

Un simple post-it pour mon moi-même de plus tard qui aura surement oublié comment aboutir à une installation stable et fonctionnelle :
– iso : Ubuntu 12.04.1 (et pas la version 12.04.2 qui a déjà un kernel trop récent pour les drivers fglrx)
– si iso transférée sur clé usb via unetbootin, au démarrage, choisir le premier menu “install”
– partition /boot non chiffrée
– partition autres avec chiffrement (sans LVM)
– installation bureau cinnamon 1.6 (ou plus récente) via ppa
– activation driver 3D (mais pas d’install des drivers proprio ATI/AMD)
– configuration des X écrans via arandr

Contact synchronisation: Android/Zimbra/Thunderbird

I do use the following combination :

  • Thunderbird (Linux or Windows)
  • Android (without any Gmail/google account)
  • Zimbra mail server

And to get my address book synchronised, I installed the following softwares:

Thunderbird: Zindus

Android: CardDAV-Sync and Contact Editor Pro (make sure to install the last one to be able to edit contacts)

And use Zimbra and in Address Book tab, right click on Contacts and select Share address book:

And copy the URL bellow:

Then use this URL to set your configuration in Zindus:

and add a CardDAV account with the URL and you mail/password

and voilà, you have the 3 places synchronised on the go!

Ubuntu 12.04 : passphrase blank screen

Si vous utilisez Ubuntu 12.04, en version alternate, avec les disques chiffrés via Luks, Grub et/ou l’écran de demande de passphrase peut ne pas apparaître (écran vide ou noir).

Il y a un problème de fonts à recopier :

cd /usr/share/grub/

sudo cp *.pf2 /boot/grub

Puis il faut modifier le fichier /etc/default/grub pour coller avec les paramètres suivants (en gras les paramètres à modifier) :

# If you change this file, run ‘update-grub’ afterwards to update
# /boot/grub/grub.cfg.
# For full documentation of the options in this file, see:
#   info -f grub -n ‘Simple configuration’

GRUB_DEFAULT=0
#GRUB_HIDDEN_TIMEOUT=0
#GRUB_HIDDEN_TIMEOUT_QUIET=true
GRUB_TIMEOUT=10
GRUB_DISTRIBUTOR=`lsb_release -i -s 2> /dev/null || echo Debian`
GRUB_CMDLINE_LINUX_DEFAULT=”quiet splash nomodeset
GRUB_CMDLINE_LINUX=””

# Uncomment to enable BadRAM filtering, modify to suit your needs
# This works with Linux (no patch required) and with any kernel that obtains
# the memory map information from GRUB (GNU Mach, kernel of FreeBSD …)
#GRUB_BADRAM=”0x01234567,0xfefefefe,0x89abcdef,0xefefefef”

# Uncomment to disable graphical terminal (grub-pc only)
#GRUB_TERMINAL=console

# The resolution used on graphical terminal
# note that you can use only modes which your graphic card supports via VBE
# you can see them in real GRUB with the command `vbeinfo’
GRUB_GFXMODE=1280x1024x32,1280×1024,640×480
GRUB_GFXPAYLOAD_LINUX=1280×1024

# Uncomment if you don’t want GRUB to pass “root=UUID=xxx” parameter to Linux
#GRUB_DISABLE_LINUX_UUID=true

# Uncomment to disable generation of recovery mode menu entries
#GRUB_DISABLE_RECOVERY=”true”

# Uncomment to get a beep at grub start
#GRUB_INIT_TUNE=”480 440 1″

Puis lancer la commande :

sudo update-grub


SSH, ça sert à rien


J’y ai encore eu droit au téléphone cette semaine. Comment un prestataire qui s’occupe de l’hébergement peut me répondre ça ? “SSH, ça sert à rien”


Allez, au hasard, merci de m’indiquer comment je peux réaliser les points suivants simplement, par FTP :

  • versionning git (add, commit, checkout, branch, etc.)
  • grep (pour retrouver une fonction planquée)
  • find (pour retrouver un fichier planqué)
  • mysqldump pour une sauvegarde rapide de base
  • création de lien symbolique
  • lancement de scripts liés au framework (symfony par exemple)
  • backup complet
  • rsync différentiel
  • check temps réel des logs
  • etc

Mais non, SSH ne sert à rien, surtout continuez bien à proposer un hébergement digne du siècle dernier.

Humble Indie Bundle 6

Pour ceux qui ont raté l’info, il vous reste 5 jours pour acheter l’humble indie bundle 6, avec une sélection de 10 jeux (!), pour le prix que vous souhaitez.
Sortez des chemins d’Ubisoft et autre “grands” (ou plutôt gros) studios et découvrez d’autres gameplays et autre pépite dans les jeux vidéoludiques.
Evidemment, tous les jeux sont disponibles sur Win / Mac / Linux, sans DRM et avec la BO.

https://www.humblebundle.com/

hostname : name or service not known

Pour ceux qui galèrent avec leur hostname en FQDN, voici le tuto à suivre :

Getting the FQDN to work properly can be a b*tch. 😉

Basically, for the FQDN resolution to work correctly, three (or four)
things need to play together. That’s the files /etc/hostname,
/etc/hosts, /etc/resolv.conf and your external nameserver (provided by
your hoster e.g.).

Let’s say your server’s hostname is “lyra” and its already
established and externally resolvable domain name is “tianet.de”. Let’s
further say that lyra’s IP is 46.4.181.243, and the nameserver that
forwards requests to the outside has the IP 46.4.181.241 (real-life
example from my experimental Virtualmin VM).

Then the contents need to be as follows:

/etc/hostname

lyra

/etc/hosts

127.0.0.1       localhost
46.4.181.243    lyra.tianet.de lyra

(Note that I have both the FQDN and the standalone hostname there.)

/etc/resolv.conf

nameserver 46.4.181.241
domain tianet.de

After setting these contents, it might be helpful/required to reboot the machine or execute /etc/init.d/networking restart, though usually that’s not necessary.

hostname should then reply with “lyra”, and hostname -f with “lyra.tianet.de”.

If you still have trouble then, you can additionally check the file /etc/nsswitch.conf which tells the system which facilities to consult for resolving various stuff. You should have a line like this there:

hosts: files dns

If it’s missing or deviating, edit it to this.