

Introduction
XCSoar is an amazing software for sailplane, hang-glider and paraglider. But lack the proper hardware with the following features:
- sun readable ( eink)
- usable with gloves (anything but capacitive)
- long battery life
- running android/linux
- GPS and/or bluetooth
- dirt cheap (yes 50€/£/$ for this hardware is dirt cheap)
The Kobo Mini is a very good eReader (unfortunately no more retailed) appears to be meeting all theses requirements except the GPS.
Hardware
Component list
You will need for this mod:
- Kobo Mini reader
- GPS module with serial output or a BlueFlyVarioTTL
- 3D printed spacer
- extra battery
- iron solder (a good one, I use this)
- solder wire and a piece of flat ribbon cable
( By the way, the way Kobo handles the first boot is just crap: no I don’t want to register my device online or anything, just to drag and drop my own ePub books, thanks! )

GPS module instructions
Solder the MTK3339 GPS breadboard (with a piece of flat ribbon cable such as IDE, Floppy, whatever..)
 KOBO to GPS MTK3339 wiring
KOBO - MTK3339
KVCC <-> VCC
TP2 <-> BACKUP (TP2 is just below the battery connector)
RX  <-> TX
TX  <-> RX
GND <-> GND
Don’t forget to cross RX<->TX and TX<->RX (the eternal embedded engineer question, RX TX….)
Just in case you wondered, yes the BACKUP does accept 4.2V (TP2 is battery test point, so not regulated), and not just 3.3V (have a look on the MTK3339 datasheet)
You can download the STL of the “Kobo mini Case Spacer II” on Thingiverse

And download the gps cover

The STL (in mm) file is then printed by Shapeways for just 22€ incl P&P, delivered in about a week: very cool!

-resized")
You will need 5screws, size M1.6 and 8mm (my 10mm were too long, I had to cut them with a pair of pliers)


All fit snugly, even the original back cover.

Add ON/OFF button to switch the GPS power (a simple SMD switch to the GPS’s VCC)
So I can still use it as a regular eBook without draining the battery and without the blue led blinking in the dark.

The switch is accessible by nails as it’s quite recessed.
 Add a label for even more clarity.
BlueFlyVarioTTL instructions
Or this set for the BlueFlyVarioTTL, download the cover: And download the spacer for the battery:

The file STL (in mm) is then printed by Shapeways for just 19€.
 You will need 5screws, size M1.6 and 8mm (my 10mm were too long, I had to cut them with a pair of pliers)
Solder 0.1″ header

And remove the black plastic from the header
 Drill 5 holes with a 1mm bit, using the module as guide
 Insert it
 Then solder the 5 wires
 Use 2 parker 3mm screws
 That’s it

Battery for GPS module or BlueFlyVarioTTL
The original battery of 1000mAh gives from 4 to 6h, which can be quite a limitation.
The original 1000mAh beside the new 3800mAh battery
The new battery li-ion from AliExpress measure 4x75x86mm, with 3.7V and 3800mAh. Warning, you need the 3D printed spacer to use this battery.
I removed the original one and harvested it’s connector for the new one.
To remove the original double side taped battery, use an air dryer or so (warning not a hot air gun, it would be too hot)
The new battery is held firmly with double sided tape and now it last about 20hours of flight: perfect. (but the drawback: it is quite heavy to read in the bed now….)
Software
They are tons of tutorials on the web, I wont describe it any further, but simply put, it works this way:
Download XCSoar KoboRoot.tgz: http://www.xcsoar.org/download/data.html
And place it on the kobo root file system using any file browser, restart and you are done.
GPS configuration
GPS module
For the GPS module, set the device to /dev/ttymxc0 at 9600bauds, generic drivers.
BlueFlyVarioTTL
For the the BlueFlyVarioTTL, set the device to /dev/ttymxc0 at 57900bauds, blueflyvario drivers.
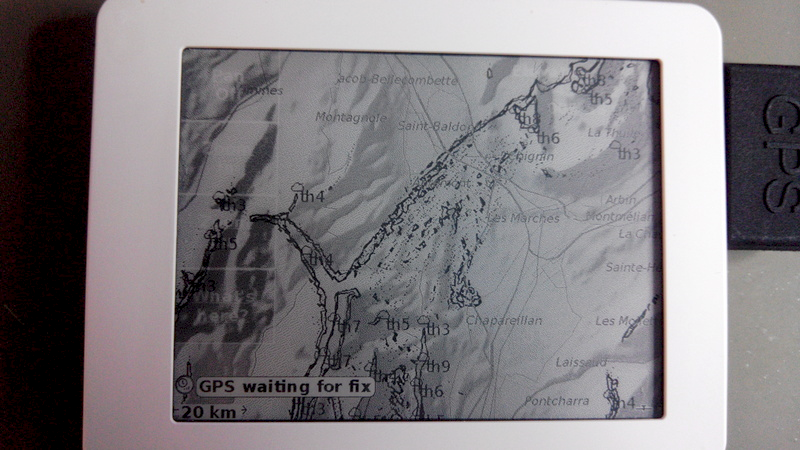
“GPS waiting for fix” should appear, note that the first fix can take up to 15min (30s later on, thanks to BACKUP power supply to keep the RTC and ephemeris)
You can change the sink alarm and volume:
- Enable Wifi, and Telnet,
- Connect to with telnet to the Kobo,
- send the following commands:
stty ospeed 57600 ispeed 57600 -F /dev/ttymxc0 #configure baudrate
stty -F /dev/ttymxc0 raw #set device as raw
echo ‘$BFS 2500*’>/dev/ttymxc0 # sink alarm to -2500cm/s
echo ‘$BVL 70*’>/dev/ttymxc0 # volume to 70%
Maps
Then download the map: http://www.xcsoar.org/download/data.html
Download hotspot (probable thermal) as way-points (wpt format), and set the file in way-points configuration): http://thermal.kk7.ch/, save all this map file to the correct XCSoar folder.
I created custom map content to have paragliding skyways displayed on XCS:
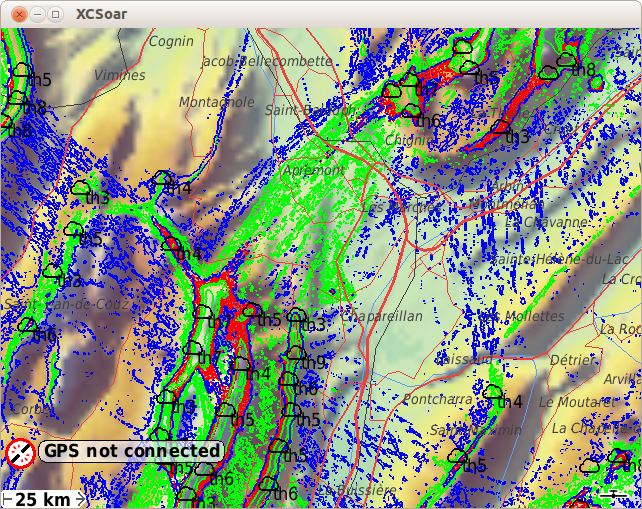
More detail here: http://www.dotmana.com/weblog/2014/07/xcsoar-generate-custom-maps/
And here you are, you have a comp GPS for less than 100€/$/£ for paragliding/sailplane, in about an hour of work.
Result with GPS module
Result with BlueFlyVarioTTL
(note the green led flashing when lifting)
leGPSBip: solar vocal GPS alti vario
This device is ready to use with the Kobo or any smartphone, simply connect it and voila! You have a fully GPS/altimeter enabled smartphone.


It also act as a standalone vocal GPS variometer when not connected, pretty convenient:
 More info here: http://www.lebipbip.com/legpsbip-solar-vocal-gps-alti-vario/
Links and references
XCSoar forum: http://forum.xcsoar.org/viewtopic.php?f=3&t=1242
Kobo GPS mod on another blog: http://www.extreme-nature.de/?p=9114
M1.6×8 screws: http://www.ebay.co.uk/
Commercial Kobo mod: http://www.goflyinstruments.com/gofly-project-v4/
XCSoar forum about this mod: http://forum.xcsoar.org/viewtopic.php?f=3&t=1404&start=10
Li-ion battery on AliExpress: http://www.aliexpress.com/item/L002-3-7V-3800mAH-457992-PLIB-polymer-lithium-ion-battery-Li-ion-battery-for-tablet/1477811584.html
BlueFlyVarioTTL http://blueflyvario.blogspot.com.au/2014/11/blueflyvariottlgpsv10-released.html
BlueFlyVarioTTL case: http://blueflyvario.blogspot.com.au/2014/07/blueflyvariottlgps-simple-case.html
Mini Solar vario: http://www.lebipbip.com/
STL archive: Kobo_Mini_case


-resized")


